

A Tale of Two Keys by Chris Pettit and a successful CAD collaboration by Neil G1TZC
A TALE OF TWO KEYS BY CHRIS G0EYO
“It was the best of times, it was the worst of times, it was the age of wisdom, it was the age of foolishness”.
I hope lovers of Dickens will forgive my misappropriation of his famous saying but this is a story of two apparently identical morse keys purchased at different auctions, where wisdom may explain the reasons for their apparent differences, but foolishness probably resulted in me buying them in the first place.
Early last year I wrote a piece about the Great Northern Telegraph Company (GNTC) morse key, its origins and the part it played in the development of world-wide communications. This is the key in question.
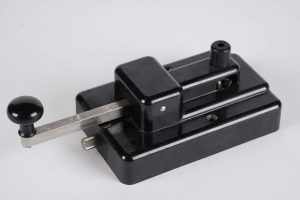
Figure 1: First GNTC key (a.k.a. The Danish Key)
The underside view (see Figure 3) shows spade terminals which enable it to be plugged into a terminal board or another associated piece of morse equipment known as an undulator which enables the operator to keep a visual record of the received morse and read it later.
In 2025 I purchased a Lot of five morse keys at an auction in Bedfordshire. Amongst them was this apparently identical GNTC key.
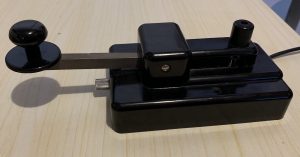
Figure 2: Second GNTC Key
These Scandinavian keys are sometimes known as Swedish Pump, Copenhagen, or Danish keys. Most are large keys with long levers and the contact at the rear of the key, furthest away from the knob. They are designed to be fixed to a desk or plugged into another piece of equipment to keep them stable. They are quite smooth to operate.
In the previous article I had established that originally the key was manufactured in Copenhagen and could be recognised by the number “605/606” impressed on the underside of the Bakelite base to identify the moulding pattern. The first key I purchased was manufactured under licence by Morse Equipment Ltd, of Tring, Hertfordshire in the UK and possibly manufactured by Sedgewall Communications Group in the 1960/70’s. I thought it would be useful to identify the differences between my two purchases. To make things a bit clearer I will identify my first (and original) purchase as: Key 1 and the second (and more recent one) as: Key 2

Figure 3: Underneath View Key 1
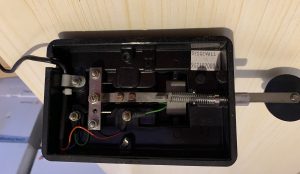
Figure 4: Underneath View Key 2
DIFFERENCES
External appearance
1. Key 1 has a Morse Equipment Limited and Serial Number label, whereas Key
shows no sign of ever having had a label.
2. Key 1 does not have skirt under the knob, whereas key 2 does. Most examples of
this key in other people’s collections show it without a skirt. I surmise that Key 2,
the later key, had the skirt as an option. It looks genuine.
Internal appearance
1. Key 1 looks to be a better quality of manufacture. Metal parts are plated,
whereas Key 2 metal parts are not bright.
2. Both Bakelite mouldings have the same pattern number in the same place
stating:
a. 605/1X
b. 606/1X
3. There is a paper label on the inside of Key 2 stating SEDGEWALL plus the number
9621020004, there is no such label on Key 1.
4. Key 1 has four Spade terminals which are wired up to the key contacts, whereas
Key 2 uses threaded screws and nut fixings wired up to the key contacts and towhich the morse plug cable is also wired. These look to be professionally done rather than modifications carried out by an amateur, that is you can’t see wherethe spade terminals would have been on Key 2.
5. Both keys have an access slot in one end to allow a cable to be fed through to the connections. This would not have been required when the spade terminals on Key 1 were used in conjunction with a separate terminal interface board (which was shown on the earlier article).
Clearly from the early evolution of this morse key when it was manufactured by the Great Northern Telegraph Works in Copenhagen, then under licence by Morse Equipment Limited of Tring, it underwent changes. Was this because of specific applications, markets or availability of materials? To try and find out more, I decided to research the company Morse Equipment Limited and its sister companies, Teleprinter Equipment Limited and Communication Accessories Limited.
An advert from Wireless World, May 1973, (reproduced in the previous article), showed that each of these companies traded from the same address; 77 Akeman Street, Tring, Herts. An associate company Morse Equipment (Military) Limited was incorporated in 1994 and in 1996 the company moved to the Apex Business Centre in Dunstable from Akeman Street. The company was finally dissolved in 2010. I have not been able to discover anything which clearly defines the business relationship between the Great Northern Telegraph Works, Sedgewall Communications Group or Morse Equipment Ltd. Were Sedgewall contract manufacturers for Morse Equipment Ltd? All these businesses were in communications equipment manufacture and supply. Great Northern became GN Store Nord A/S and today the group consists of GN Store Nord A/S, GN Hearing A/S, and GN Audio A/S. GN develops and manufactures intelligent hearing, audio, video, and gaming solutions. Sedgewall is a sub-contract manufacturer of electronic and electro-mechanical products and operates within the defence, intelligence, aerospace, maritime and emergency services sectors.
KEY CONSTRUCTION
All straight keys have screw fixings which can be adjusted to give the required spacing between contacts; one on the lever arm (aka the hammer) and one on the base or frame (aka the anvil). There is also another screw which adjusts the tension of the spring that opens the contacts when the key is released. These settings can be adjusted to suit the operator’s preferences. Most straight keys have their contacts and screws fully exposed, although many keys used professionally would probably have a separate cover to prevent tampering and the ingress of dust.
The GNTC key is different in a couple of ways. First everything is housed and mounted in a Bakelite cover. A knurled metal knob which sits under the key arm adjusts the tension on a horizontal spring connected to the lever arm. Turning the screw clockwise increases the tension on the spring, turning it counterclockwise does the reverse. A vertical plastic smooth knob at the front of the key covers a brass slotted screw which has the upper contact on one end. This is used to adjust the contact gap. You set the gap using a screwdriver on the screw. Once set, you turn the plastic knob to “lock” the brass screw in position. Pressing the key down causes the lever arm to raise and close with the upper contact, thus completing the electrical circuit.
WHAT NEXT?
Not being able to find out anything more about the development or history of the GNTC morse key and its successors, it was time to decide what I was going to do with this duplicate key. I am attracted to keys which have been used professionally, and Key 2 is a nice key but, if it is not going to be fixed to a desk it needs to be mounted on a base or platform, to keep it stable on the desk. I also thought that with such a long keying arm, it may benefit from a base that extended under the arm to prevent it from “tipping” under a heavy-handed fist!
WRC member Neil G1TZC had already designed and manufactured a 3D base for an old Marconi Marine 365 morse key and offered to do the same for this key. We exchanged sketches and ideas, and he came up with the proposal below in less than 24 hours. It took less than one hour to draw using OneShape, an online 3D package and 7 hours to print.
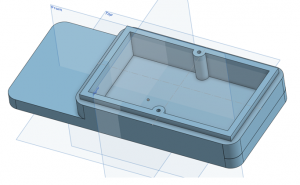
Figure 5: Neil’s 3D design
Neil explains his strategy for this project.
“This project was built from the bottom up. So, the base section was initially a 200 x 90 rectangle sketch. Then radius off the corners at 10mm. Then you extrude that. Chris wanted a 10mm block at the front, so I went with that for the whole of the base – this is where the whole 3D thing comes in. Inside the box he only wanted 5mm for the base, but with 3D you think beyond the old way of drawing. You add another block the size of the key footprint which was 140 x 90. Again, radius the corners at 10mm. This gets you to a block on a block. Then a lip to sit inside the key to stop sideways movement. This was 130 x 80, to give a 5mm lip all round. Then comes the neat bit. You can extrude backwards. That gives you the open box. Add a couple of screw posts to hold the key in place and you are done. A 45-minute project. It is being printed as a high-quality finish. This takes much longer to print and uses far more plastic but still works out at only about £3 material cost.”
Neil did a great job on this base and the smooth finish blends in nicely with the key to make it look right, even though it is not possible to get a high gloss finish with 3D printing. The next part of the project was to fit the lead weights in the new base. I chose weights which are used on vehicle wheels for balancing (available from Amazon). They come with a self-adhesive backing so affixing them to the base was easy and I found that I had room for weights totalling 800g. This gave the key a real solid feel to it which promised to remain rock solid even in the hardest of key pounding.
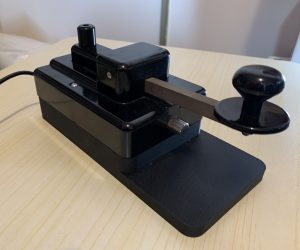
Figure 6: Key mounted on 3D Base
After trying out the key for a few QSOs, I became concerned that, at a height of 71mm, the position of the knob would mean that the operator’s arm would not be comfortable for long term use. In the event, further testing over a few days confirmed that this wasn’t a comfortable height. So, we entered phase 2 of the design.
3D BASE PHASE 2
I asked Neil to reduce the base height by 10mm. I wouldn’t have so much depth to fit all the weights but experimenting found that three layers of weights at 600g was possible. At the same time as reducing the height of the base, I decided that the front stabilising platform was also not necessary and spoilt the overall look of the key. I asked Neil to remove this at the same time as adjusting the height. In the end Neil came up with a height reduction of 9mm which avoided a complete redesign.
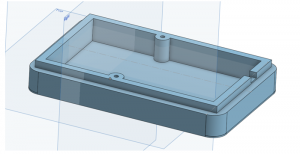
Figure 7: Neil’s 2nd 3D Base
With original GNTC key fitted (no knob skirt), it looked excellent, so weights were fitted to this one and the key was put through its paces over a few days. After a while it became apparent that, for me personally, the key was more comfortable to use with a skirt under the knob, which Neil was kind enough to also produce on his 3D printer
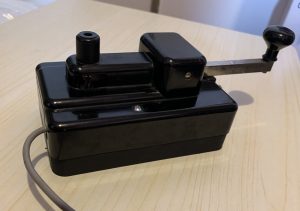
Figure 8: Mounted on 2nd 3D Base
This seemed like a good time to review where we had ended up. We had two pretty much identical keys. One with a higher base and a stabilising platform and one with a lower base but no stabilising platform. Neil kindly offered to produce a third base, and it was now time for me to decide as what it should be. After much deliberation, I decided that I wanted to end up with two bases both of similar height but one with a stabilising platform and the other without.
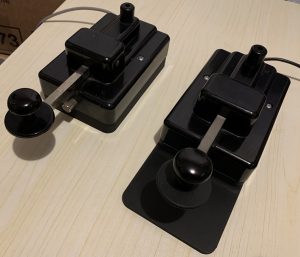
Figure 9: The Final Result
Both keys are comfortable to use, although I am not an experienced enough as a “telegraphist” to have long “rag-chew” QSOs with experienced operators. Originally, being professional keys, they were designed for long term use and are easily adjustable to suit the operator’s requirements. What shall I do with them? Well, I have no idea of their true value and I have invested some cash in them, so I think I will keep them safe and bring them out on those occasions that call for a bit of vintage CW with the other “old fist thumpers” out there.
73 TU dit dit.
de Chris G0EYO