

Restoration of Vibroplex Champion Semi-automatic Bug Key
Origin of Bug Keys
I started my working life with GCHQ as a 16 year old trainee radio operator at Bletchley Park in1963, learning to receive Morse (CW) which I had to write down in at about 25wpm. As an intercept operator I had to be very accurate in what I received and my writing had to be plain and clearly understood. I also had to copy morse traffic as a touch typist using an old Remington typewriter. Thus began a 60 year love-hate relationship with a mode of transmission that I always admired for its purity, but of which regretfully I was never taught to send or head read.
The first morse keys were used in 1844 on the early Morse Telegraph system by Mr Alfred Vail in a demonstration between Wahington and Baltimore in the USA. It was basically a simple switch which opened and close an electrical circuit, Vale used a code system invented by Samuel Morse who had granted Vale rights on its use. Since the first Morse telegraph systems were built an never ending variety of different types of keys and keyers have been produced including; straight keys, automatic and semi-automatic keys and much has been written about them.
“While some may say that they are simply a switch, this is most certainly not the case. Morse keys have been the subject of over 300 patents in the USA alone, and they have undergone a considerable amount of development. The way in which keys have developed since the very first ones used by Morse himself is a fascinating story. Some styles of key are quite familiar, whilst others have quite unusual attributes and as a result many people find collecting keys a fascinating pastime.” *
One of the most famous names in Morse key history is Vibroplex. Founded in 1905 in New York by Horace Martin who was the original inventor of the semi-automatic or “bug” morse key which automatically produced rapid dots by using a weighted pendulum or arm to quickly make and break contact in the electrical circuit. They are still manufacturing morse keys today. Although he had many patents to protect Martin’s invention, the “bug” principle was soon copied and developed by many other manufacturers around the world. ( I came across the famous Eddystone Bug Key Model 689 which was manufactured c1949-54 when I worked at Eddystone Radio Limited – second hand models can still sell for £90+ today; originally they cost £3.17s 6d). Fortunately there is such a passion in collecting and using these keys that much has been written about them and because they put serial numbers on each key, it is relatively easy to date the manufacture of them.
Anyway back to me and CW. I was licensed in 1985. First as a B licence holder (V/UHF only) but in 1986 passed the 12 wpm morse test to get my A licence; G0EYO. However I never had the confidence send CW on air even though it was a annual resolution to do so for nearly 40 years. Then I came across John M6KET to whom I taught the Foundation Licence class at Wythall Radio Club in 2013. Over the years I got to know John well as a member of the club and admired his dedication to both CW operation and QRP. Another club member, Lee G0MTN and work colleague Dale G3XBY further inspired me with their proficiency with the IAMBIC keyer. However it was a chain of events starting with the passing of club member Roy G0HDF in 2022, which resulted in me deciding to make a real effort to become a proficient CW operator. In Roy’s SK sale was a Kenwood AT230 manual Antenna Tuning Unit. In 2014 I had purchased the Kenwood TS530 transceiver,previously owned by club member Walter Chance M0GRO (sadly also SK). Seeing the two units together I realised what a thing of beauty this radio was, so set about looking for the matching Kenwood speaker SP230, which I eventually found on E-Bay. From Roy’s SK sale I also purchased a Japanese Ameko K-4 telegraph key (J38 type). Practising with this key in late 2022 I found I preferred its feel to my Hi-Mound HK702 key which I eventually sold to John M6KET. Perhaps I now had the right gear to do something about my long held ambition. So with encouragement from John who offered me daily practise skeds on CW, the adventure was started.
I had the straight Ameko key but my rythmn was poor and my callsign couldn’t be recognised by the RBN network. For many years I had owned a Kenpro KP-100 Squeeze Key so I started to use this and found I liked it and made it my main key. However I always wondered what it would be like to use a bug key. Then in February 2024 I saw a collection of morse keys for sale in a Stourbridge Auction house which included a Vibroplex Bug Key. I decided to bid for them, but not being able to check them out their condition in person, I knew I would be taking a risk. I won them and the auction house shipped them to me in Redditch. They comprised a Vibroplex Champion c 1949, a couple of Robert Kent Straight Keys, probably 1950’s vintage and a couple of WW2 WT8 Amp military keys. The final item was an Admiralty Pattern 1271 Buzzer and Repeater and Key Unit, a strange item which will need some research as to uses and scarcity. My intention is to restore these keys to their former glory and perhaps sell on or keep to use.
The Vibroplex Champion: Ser. No. 164719.
This Key was is poor condition when received. Although complete, it was going to need a thorough restoration, which meant stripping it right down to its individual parts, cleaning and polishing them and reassembling.
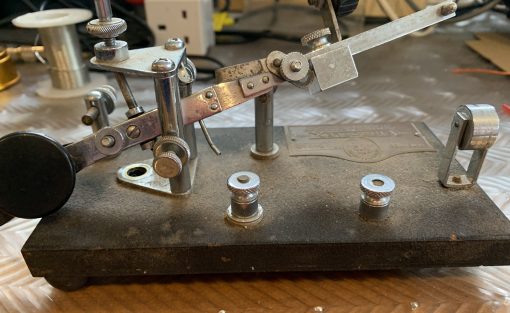
after unpacking!
First I had to make sure it was complete so I reassembled it. All the chrome-work was dirty and had some surface rust. The paddle pivot boss at the base of triangle was loose and would need fixing. I took pictures of the key from many angles so that I could re-assemble it without relying on memory. The big risk I was taking, was would it work properly after the restoration? Any worn parts would not be able to be replaced and the paddle pivot mechanism looked very tired.
looks complete
I dis-assembled it carefully, putting individual parts in small plastic bags and marking clearly what they were and where they came from. I made notes of the order of dis-assembly.
Cleaning
Cleaning started with soaking the base in warm soapy water for 30mins then scrubbed it down using toothbrush. The Name plate came up well but still, what might be rust marks or ingrained dirt, where visible so I tried other methods; vinegar, metal polish, metal polish etc. In the end Vinegar followed by scrubbing with concentrated fairy liquid and then finish in warm soapy water seem to do the trick. Next was the paddle assembly which I carefully dismantled and soaked the individual parts in warm soapy water then dried them and polished them with metal polish and re-assembled it. Each of the other parts was treated similarly. I used Araldite to affix the paddle pivot boss at the base of triangle and then using the notes and pictures I took during dismantling I put the key back together in preparation for setting up the gaps and seeing if it worked as it should.
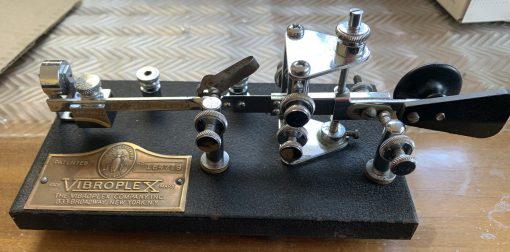
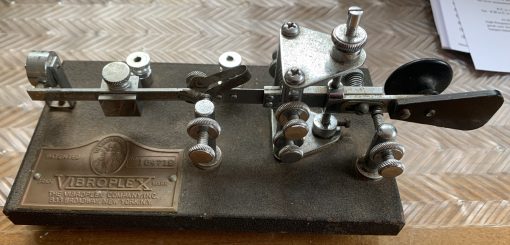
after cleaning
Re-assembly
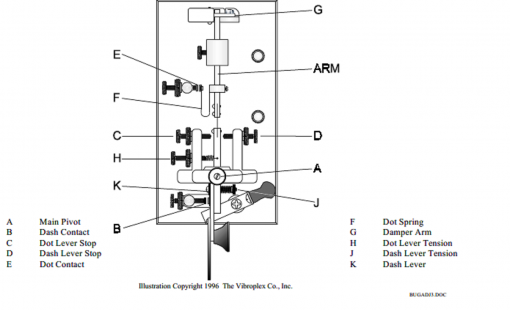
As you can see the key looks a lot better after the clean up, so now was the time to make sure it is set up properly. Fortunately, you can download an article by Brian Murphy VE2AGO originally published in QST Magazine, which gives good advice on setting up semi-automatic Vibroplex bug keys.** See sketch below. The setting up objectives are to make the dots of correct length with correct ratio of dot to space length and to prevent vibration of the moving dot contact F resulting in scratchy dots. We also need to prevent any unwanted bouncing of the dot contact F and finally to keep the time between dot groups and dashes down to the length of one dot. The setting up procedure described by Brian VE2AGO is quite involved and demands your complete attention. I abbreviated the procedure just so I could get the key “working” to test it. Given that this a “right handed” key and I am left handed I may never use it in anger. I will have to look into that later, clearly their use involves quite a bit of skill.
Setting up
The following is my abbreviated set up procedure.
- Identify adjustments C, D on the diagram below
- G is not adjustable on the Champion damper so D should be adjusted by clearing D,C and E away so that the paddle arm comes to rest against the damper
- Adjust D so that the paddle arm slightly touches the damper, such that when the arm springs to rest against the damper there is no visible bounce. This ensures that when another group of dots is started the arm is still not vibrating.
- With E still clear, adjust C for optimum distance between D and This is fiddly.
- When the paddle is pushed for dots the lever butts up against C which sets up the oscillations of the arm.
- Moving the lever from D to C takes time so that transforming from dashes to dots is faster and therefore smoother if the distance is kept small. However there is then the possibility that the arm does not gain enough momentum to make long slow dots. Take your time to get this right.
- Much of the set up procedure is to do with getting the speed in wpm as you would wish to operate the key. This involves positioning the arm counterweight, adjusting the spacing of the dots contact E and the dash spacing contact I shall leave this procedure for a later date should I wish to use the key.
* Electronic Notes – Morse Key Development and History – https://www.electronics-notes.com/articles/history/morse-code-telegraph/morse-key-development.php
** Semi-automatic Key Adjustment Brian Murphy VE2AGO (from QST magazine) https://www.vibroplex.com/techdocs/champion_adjustments.pdf
Written by Chris Pettitt G0EYO
9/3/24